NOTE: This article was posted on August 9, 2019 and is incomplete, I will complete this article complete with pictures a.s.a.p. so check back.
There is an ongoing discussion about the fit of boler doors, the following is my analysis of the door and best method(s) to improve the fit.
There are a number of reasons that will cause your door to not close or seal properly. There is a common misunderstanding that all boler doors lose their shape or sag over time causing them too fit poorly and not seal, this is not totally true, so let’s take a closer look at the problems and how to fix them.
Because there is not a single cause for door fit problems you will need to first determine what is the cause.
- Frame
- Body
- Door
- DIY Fixes and Modifications
The Basics that all boler owners should do
Water in the door
On the boler door if the window in the door leaks at all, water can collect inside the door cavity. Since there is no place for the water to drain it will collect over the years slowly willing the cavity with water. This water can cause several problems:
- Water is heavy, as the door weight increases this puts extra stress on the hinges causing them to wear faster and often they will move where mounted to the body resulting the door dropping and becoming misaligned.
- On the solid core door the fibrous material inside the door will absorb the water, expand and cause the door to deform and go out of shape. Further damage can result if the wet core freezes
- On the door with the moulded inner panel, If the water in the door freezes it can expand damaging the door including the lamination between the two panels.
Draining water from the door
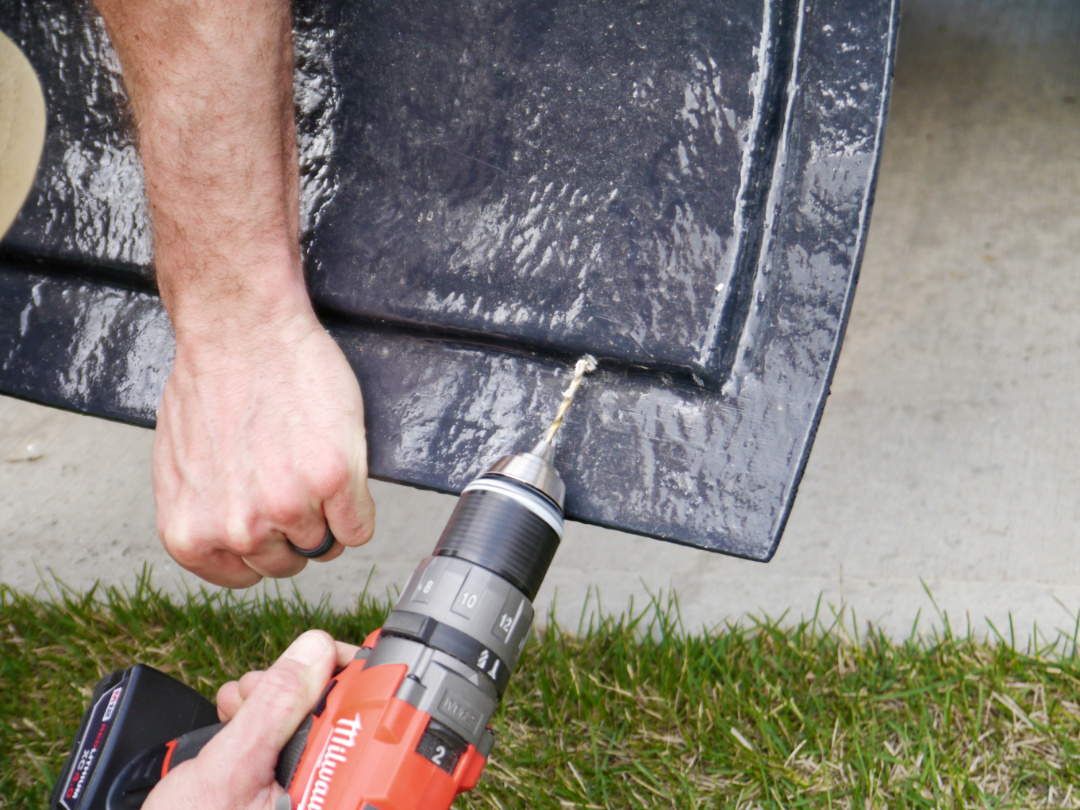
- Every owner should drill drain holes in the bottom of their door to allow any water that gets inside the door to drain out. Drill three to four ⅛” diameter holes along the lower profile of the door as shown in the attached pictures
Hinges
The hinges on your boler door are very unique and beautifully engineered. Called a self centering hinge they are the only type of hinge that will work with a curved door on a curved surface. As the door is opened the hinge pivots around the brass ball, not the horizontal bolt, this allows the pivot point to change throughout the swing. All the through bolt does is prevents the hinge from coming apart, it MUST NOT be tightened, the spring will keep some tension on the bolts but the bolt should move up when you push on the nut, if the bolt is too tight it will bind and cause the fibreglass to crack around the hinge mounting surface.
These hinges are designed to be rebuilt, the brass ball will wear over time and often the spring and bolt will corrode. The hinges are easy and inexpensive to rebuild using the stainless steel hinge rebuild kit offered through Camping Treasures. Full instructions for rebuilding the hinge is available on the website.
The hinges must be in good condition or rebuilt before moving onto other steps
Weatherstripping
A major cause of boler doors not sealing correctly is the weatherstripping. Often when a gap is seen around the door a thicker foam type weatherstripping is installed, the thinking is this will fill the gap. Unfortunately, the exact opposite happens, the foam weatherstrip is too firm for the door to compress it, instead the weatherstripping further distorts the door causing even greater gaps. The only weather seal that works well is a very soft rubber bulb type seal, my favourite is this double seal that is applied around the door opening (not around the door). When first installed the door will be very difficult to close, just force the door closed and walk away for a day, this allows the seal to conform to the door and the gap resulting in a tight seal and the door will close easily
Read on, before you replace your weatherstrip you want to repair your hinges (if needed) and adjust the door without any weatherstrip in place, the last thing you do when you have your door fitting correctly is to install the new weatherstrip.
The door seal must be a hollow bulb seal, a foam seal like found at many home improvement stores are too firm and will distort the door leading to a poor seal.
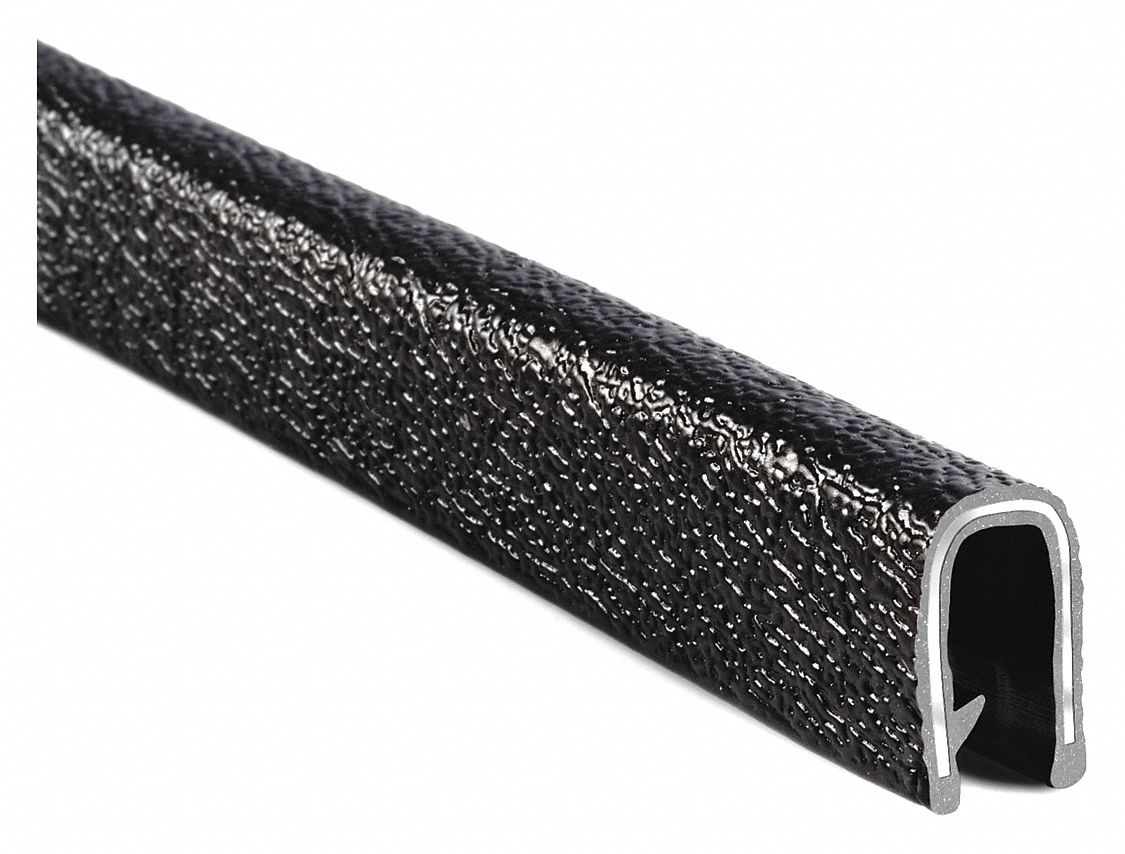
There are two options I recommend for the door seal is Trim-Lok seal, number 5036BT, similar to this  Make sure it has a strong adhesive to attach it to the door frame.
When using this seal many want a finished edge around the door opening, this edge trim fits over 1/4″ edge. (although this trim is available in white it is much more difficult to find) Search for Trim Lok 1375B3X1/4-25
The second option is a bulb seal with an integrated trim strip similar to this Trim Lok 10D075, again the metal edge is for 1/4″ and the bulb is about 3/8″ to 1/2″ diameter
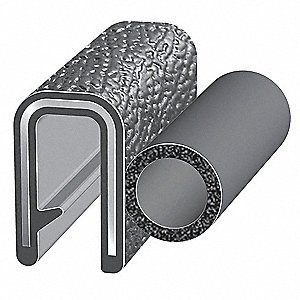
There are other manufacturers of seals and trim that will work, the important thing is that the seal is a soft bulb about 3/8″ to 1/2″ in diameter.
Many of the seals and moulding I suggest above may be available through other suppliers like Amazon, Ebay, Grainger, Zoro to name just a few.
Hinge & Door Adjustment
A relatively slight misalignment of a curved door on a curved surface will create a noticeable gap or misalignment of the door.
Over time the weight of water in the door and worn hinges can cause misalignment with the door, start by looking along the top of the door, the door should sit between ⅛” to ¼” below the door header with this space should be level and straight. At the same time the door should be centred in the opening with even and straight gaps along each side.
- If the door is centred and the side gaps even but there is a large even gap at the top, then the door just needs to be moved up.
- If the door is centred and the side gaps even but there is a large angled gap at the top, then there is a good chance the frame is bent, twisted or broken. When the door opening is not square this is an indication that the body is twisted, the most common cause of this is the frame. (see the article on frame problems)
- If the door is NOT centred and the side gaps are NOT even the hinges need adjusting
Hinge Adjustment – The first step in adjusting the hinges is to remove the weatherstripping around the door. The wrong weatherstip or if your weatherstip it too firm it will prevent the door from closing properly and actually twist or bend the door preventing it from closing evenly.
The hinges location on the body are adjustable, the mounting holes through the body should be slightly larger than the bolts (¼” bolts in about 5/16” or slight less holes), by loosening the hinge to body bolts the door can be adjusted. The arm on the door side hinge leaf should be parallel to the ground, this leaf often moves which causes the door to lower and gap to close next to that hinge.
Adjusting the hinges is more art than science, you can adjust each leaf independently, a rule of thumb is the leafs should be straight and equal distance from the edges.
NOTE: There are several things to take note of:
- You may need to enlarge the holes slightly, when enlarging the holes I recommend you use a ¼” drill bit and carefully create a “slotted hole” by using the side of the drill bit to elongate the hole in the direction you need to move the hinge.
- Often the bolts are seized into the hinges, over time the steel bolts threaded into the aluminum a process called galvanic corrosion will make it almost impossible to remove the bolts. All is not lost, carefully centre punch the exact centre of the threaded end of the bolt from the outside. Starting with a ⅛” drill bit slowly drill a hole through the centre of the bolt. Using progressively larger drill bits gradually increase the size of the hole being careful not to slip and drill into the aluminum. When you have completely drilled out the seized bolt, or when you have drilled it out enough that the remains can be removed, drill the holes through the aluminum to ¼”, this will remove all the threads and leave a clean hole. When remounting the hinge use a nut and bolt through the body or door and the hinge leaf, this way galvanic corrosion will never be a problem with the threads again.
- After adjusting the hinges make sure the hinges are evenly loaded, because the hinges are spring loaded It is possible that the entire weight of the door is supported by one hinge. The test open the door about 6” then grasp the door and by the latch side and lift it up and down, there should not be any obvious movement in either hinge. If there is play around the brass ball in either hinge then that hinge is not carrying any load and either the body side leaf needs to be moved up slightly or the door side leaf needs to be rotated clockwise slightly.
Which boler door is on your trailer?
Boler used two different doors on the 13’ trailer, one used moulded panels on both the inside and outside which are bonded together into a semi-hollow door structure. There doors are identified by having smooth gel coat finished on both sides with some profile moulding on the inside around the door lock.
The second type of door used a smooth moulded outer skin that used a series of wood product filler covered with a rougher chopped fibreglass coating on the inside.
Warped door
This is most common on the solid core doors with the rough inner finish (chop spray fibreglass) when the inner core gets wet, swells and forces the door out of shape. The usual way you can tell if this is the cause of the door damaged is the lower section of the door will look straighter than the body curve, in some severe cases the door can actually start to curve outward.
The repair involves removing the saturated wood product inner core by carefully cutting the inner side of the door, installing a foam core, setting the curve of the door, then re-fibreglass the inner panel back on
- Remove the door and set on a stable platform, a pair of sawhorses works well
- Mark the inside of the door on the raised surface about 1” inside the bevel to the door edge (see image)
- Put on eye protection, dust mask and long sleeve shirt.
- Using a small cut off wheel on a Dremel cut along the line, then carefully pry off the cut panel to expose the inner core. Take your time and use a metal ruler or similar to help release the bond with the core material, don’t force the panel or it can break.
- Remove the core exposed wood product core, this will require some scraping
- Clean up the back of the cut panel
Now that your door is cleaned up you must ensure the curve is correct when you reassemble. The best way to create the curve is to make two wooden templates, one from each side of the body next to the door. Using the floor as your base line mark the curvature on a large piece of cardboard or similar material, cut the curve into the cardboard the test fit the pattern against the outside of the body. Make a second pattern of the body for the other side of the door. Transfer the pattern to wood, you can use ¾” plywood or even 2”x 6” lumber, using a jigsaw cut the wood along the marked line (remember to mark the sides the pieces are matched to).
Door latch & lock
coming soon ….
John McNamee
Hi Ian. Thanks for this amazing article and the promised followup. I have learned more about my Boler door reshaping project from this article than I knew to date. One question I have is, having done quite a number on rhe original hinges in drilling out the seized in bolts, I ordered replacement hinges from Scamp. When installing them I noticed there are no numbers 1 and 2 on them as there are on the original hinges. When I called Scamp service I was told that is how they are now made for Scamp doors. Do you know if mounting hinges which are identical to each other rather than the originals (which are clearly different) will adversely affect my door reshaping project? Thanks for any help you can give me, Ian.
Greg Wedgewood
Where can I get the Trim Lok 10D075.
Ian
Your best friend is always Google search, but it is listed at Grainger
Stephen Lowther
Does the information in this discussion also address doors on the 1700 models?
Ian
Yes, in general the information applies to boler models with the curved “aircraft style” door. For the weatherstrip that clips over the door frame make sure there is a fibreglass lip around the opening to install this onto, the adhesive version will work on all models (exception being the flat RV style door)
Stephen Lowther
Thank you Ian,
Can I also ask your opinion on reinforcing the door openings using steel? We bought ours and a previous Owner had fastened squqre steel stock to the interior of the opening to prevent the door from sagging.
Is this a legitimate concern and action?
rob livingston
for the wood cutouts;
“Now that your door is cleaned up you must ensure the curve is correct when you reassemble. The best way to create the curve is to make two wooden templates, one from each side of the body next to the door. Using the floor as your base line mark the curvature on a large piece of cardboard or similar material, cut the curve into the cardboard the test fit the pattern against the outside of the body. Make a second pattern of the body for the other side of the door. Transfer the pattern to wood, you can use ¾” plywood or even 2”x 6” lumber, using a jigsaw cut the wood along the marked line (remember to mark the sides the pieces are matched to).
are these clamped to recreate the proper curve before fiberglassing?
Ian
Yes, you clamp the outer door skin to the the templates you cut to hold it to the correct curve, then you add blocking to form the inner core (pink foam works well) the refibreglass the surface that will be the inside of the door. If you used foam you need to use epoxy resin with the fibreglass, the typical polyester resin will disolve the foam.
Caleb
Hello Rob and Ian,
Do you have any pictures or videos of this process being done? Much appreciate your expertise!
Ian
Sorry I don’t have an article on recurving the door …. yet. I am trying to document the process with pictures.
rob livingston
with the pink foam for the new core, I’m guessing this is rigid foam insulation
– the form is not curved,
– am i compressing the foam into the curvature of the door cavity to set in the fiber glass/epoxy resin
– or am i making cuts into the foam so that it bends easily into the curve and filing with epoxy/fiber glass
– do you have a photo of this
Thank you !
Ian
Hi Rob, Yes use the high density pink (or blue) ridgid sheet foam used for home insulatuion. Cut it into about 3″ wide slats and position these across the door, the top edge of the foam pieces will touch and there will be a slight gap on the other side. Use epoxy resin (polyester resin will disolve the foam) to both attach the foam blocks to the door and then use fibreglass mat with the epoxy resin (w/hardner) to coat the top surface. The fibreglass & foam sandwich should end up being a ridgid laminated panel that will never change shape.
rob livingston
one last question
just to confirm are the 3″ slats positioned vertically or horizontally in reference to top of the door?
Ian
Horizontally, so no bending or compression of the foam blocks is required.
Len
Hi Ian;
do you have pictures of the door re-curving / repair process?
Ian
Sorry I don’t have an article on recurving the door …. yet. I am trying to document the process with pictures.
Len
ok, understood. Once you cut out the raised, insulated center portion, was the door fairly easy to bend into shape using clamps on the wood pattern? or did you have to notch the inside left to right, like bending drywall, to achieve the bend?
Sorry if this is confusing!
Jennifer
will the Trim Lok 10D075 bend to the curve of the door? if so, how is this achieved? How many inches/Feet do I need to purchase?
Ian
Yes that door seal will easily bend around the door opening. The channel that clips over the edge of the door opening is quite flexible. I would measure the perimiter for your door to make sure but I believe you need about 12 feet